AutodeskBIM 360takes your project and connects it within the cloud, enabling BIM collaboration and coordination, review your documents, connect your project teams from field to the office, and helps streamline the handoff process to owners. A project can live withinBIM 360and have modules activated to manage the project within the cloud in several ways. In the fifth part of this series, we will be taking a deep dive in to theBIM 360Design Collaboration Module.
BIM 360 DESIGN COLLABORATION enables project design and construction teams to utilize the cloud to host, manage, and share their projects. Design Collaboration works directly with Autodesk Revit to enable users to host a workshared model via the cloud. Once the workshared model is stored in the cloud, that model can be shared to other users, groupds, and stakeholders in an immersive, collaborative environment.
There are a couple of ways to utilize the Design Collaboration cloud service. You can use it as strictly as a way to share models to other stakeholders by providing a single-source location to download project updates. The cloud would then act as a hub; a single-source location for all your model updates.
The other way is to use Design Collaboration as a true cloud-centered collaborative environment specifically for your Revit users. This allows them to utilize the cloud to build a cloud-workshared Revit model and host it to the service. Instead of models being located on a local server, these models can be shared anywhere at any time.
These two methods have their benefits and drawbacks when considering how your organization wishes to function while utilizingBIM 360Design Collaboration. Both of these methods do utilize theBIM 360Design Collaboration service much the same way. However, it is worth noting that creating and using a cloud-workshared Revit model enables your organize to efficiently utilize the service as it was intended. In this post, I will be discussing how an organization can use the cloud service as it was intended.
Autodesk Revit and Design Collaboration
First things first. Design Collaboration lives within theBIM 360Cloud environment. Here, Revit models cane be uploaded, managed, and shared to various stakeholders. Revit users take full advantage of this feature by creating a cloud-workshared Revit model. Here, lets discuss how to create a cloud-workshared Revit model.
First, just like with any Revit project, you must be ready for worksharing to be enabled. Once you are ready, go to the Collaborate tab within Revit. Note that for you to connect the Revit model to theBIM 360project, you must be logged into your Autodesk account that is tied to theBIM 360project. Once there, you will be able to create the shared model in the cloud.
Once Collaborate is selected, click on "Collaborate" which will activate the worksharing dialog. Here, you can choose the two ways to share and work with your Revit model. ForBIM 360Design Collaboration, choose "InBIM 360Document Management". Although this says Document Management, you will be utilizingBIM 360Design Collaboration. Again, Document Management will be where your files are stored. Design Collaboration is the module where you will utilize your Revit model as a resource.
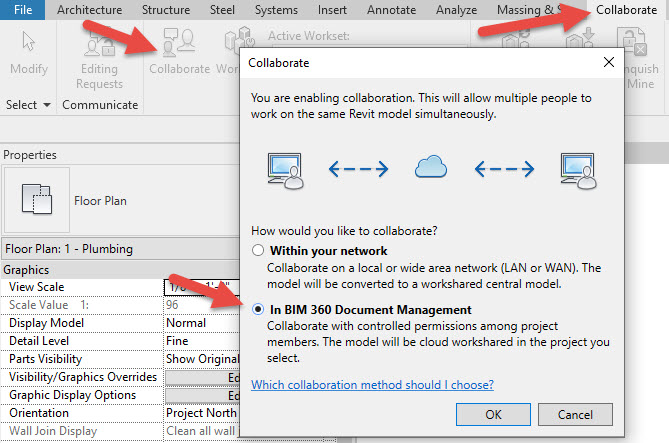
Once you click on "OK," select the appropriate account, then the project, then the file location you wish to save your Revit model. Please note that, again, you must be logged in to your Autodesk account to see these projects.
NOTE: You must save your project file within PROJECT FILES inside your project cloud hub. See below.
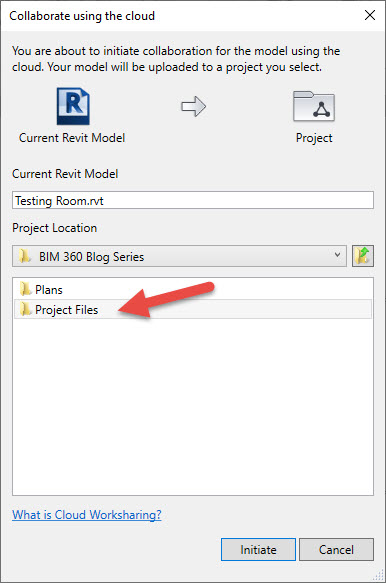
This is whereBIM 360Design Collaboration will look to for your Revit models.
Once it is finished saving to the cloud, you are ready to share your Revit model with other users!
Design Collaboration in Autodesk Revit
When a Revit model is a cloud-work shared model, you have some key features available to you that you must consider. To open and begin working with your Revit model, you must go to your Revit application and open it, much like a regular Revit model. Unlike a regular model, you will need to go to theBIM 360files location as shown below in the Home screen of your Revit Application.
NOTE: This interface is taken from Revit 2020. In previous versions, you must go to OPEN and navigate to your project file that way.
Just like with a local work shared Revit model, you will choose the appropriate model and open it. In essence, it will download a "local" model where you can perform your work. When you're ready to synchronize your model, you choose the synchronize button and it will send/receive new model information to the cloud!
Since this is a cloud-work shared Revit model, you must be connected to the internet in order to successfully synchronize your model.
There are a few key items you must consider when enabling a cloud-work shared Revit model for your project team.
- You must be connected to the internet for you to work and synchronize your Revit models.
- There is no traditional "local" model saved to your computer.
- Revit does save a Revit model forBIM 360Design Collaboration to reference. However, this is not a traditional local model saved to your computer.
- Your Revit users will not need extensive training - Only your BIM manager/BIM coordinator/Model Manager will need extensive training to understandBIM 360Design Collaboration and cloud-work shared Revit models. CADD Microsystems is vastly experienced in this area.
- All backups are stored in the cloud. You can download the models separately but all backups are stored to theBIM 360Document Management hub.
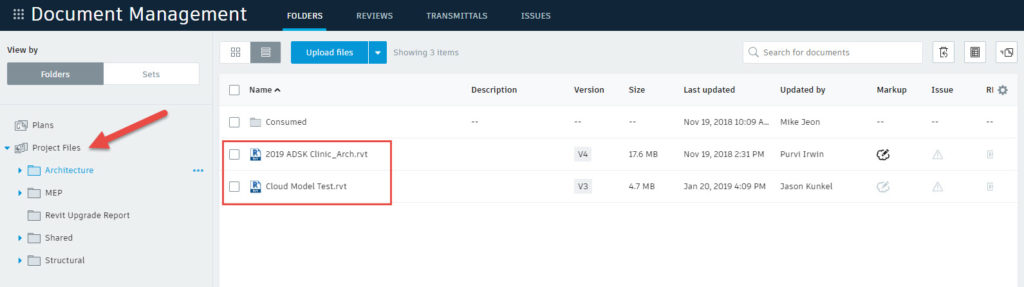
- You will see your Revit model in the Document Management hub under project files. This model enables your project members outside of Revit to see and interact with your Revit Model!
- To enact changes, they must work within Revit. Any markups, issues or RFI's added here DO NOT interface with the Revit application. These features are for Document Management, Field Management, Project Management, and Insight modules.
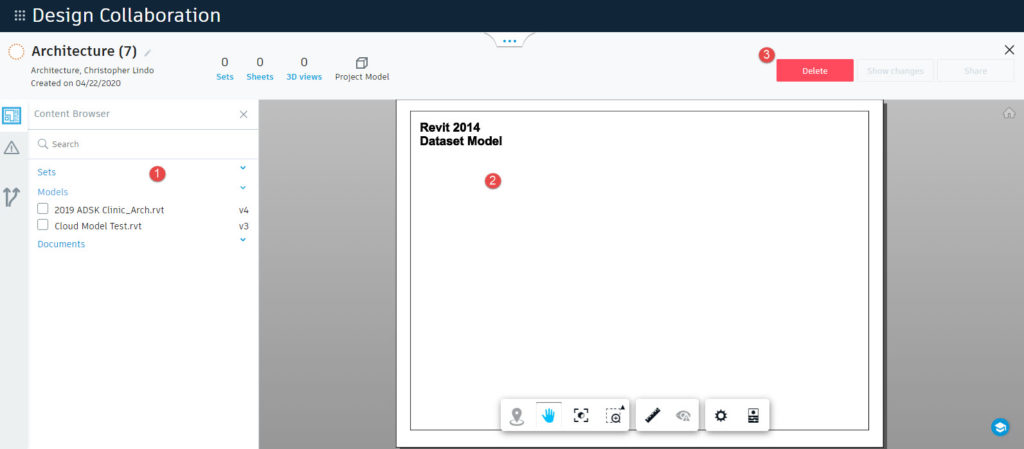
Design Collaboration in BIM 360
This is where a user can manage, interact, and share your cloud-work shared Revit model.
NOTE: No design changes within the Revit model can be made here. All changes to the model MUST use Autodesk Revit.
First, where to find your Revit model. All Revit models intended to be used for Design Collaboration must be located in the Project Files location within theBIM 360Document Management hub.
When you select it, you can visualize, add comments, take measurements, add issues, and RFI's. Keep in mind that none of these comments go back to the Revit users within the application; these are all managed within theBIM 360hub.
Now let's talk about the Design Collaboration module within BIM 360. Earlier in the post, we talked about how to set up your Revit model for Design Collaboration and how to manage your model within the cloud.
The Design Collaboration module utilizes your Revit models in many ways. It enables your Revit users to work with your cloud models in a work shared environment, as discussed earlier, and it enables project teams to share these Revit models as they choose. We will focus on the latter point here.
Interface
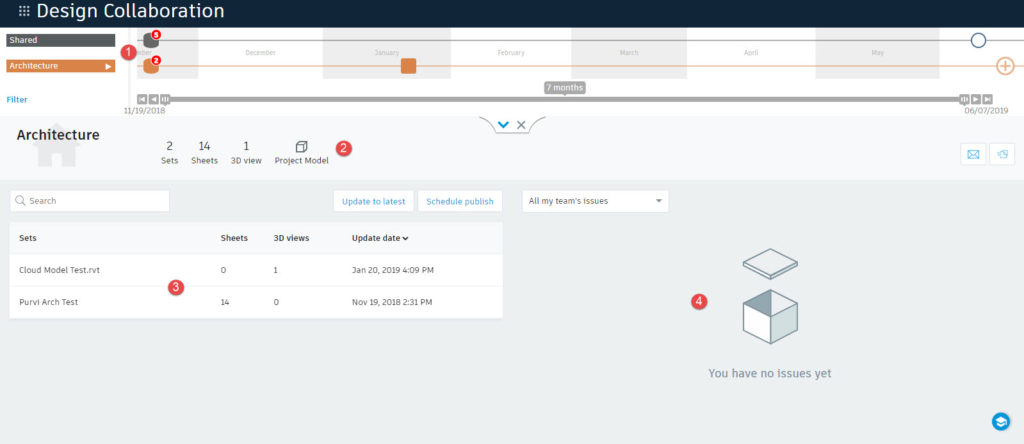
- Package Interface: Here, you will see old and new packages for the team to consume and when they were added.
- Package Information: This will show you what is part of the package that can be consumed
- Sets: Here, a user will find any sheet sets and model sets that are part of the package.
- Issues: Issues can be attached to the package and managed through Project Management and Insight modules
Design Collaboration provides a means for users to create design packages. These packages can include sheets, 3D views, and other views pertinent to the design of the project. This provides users greater control over when your model is ready to be used as an update for the rest of the project team.
For example: If I were the Architect for a project and I needed to update the rest of the team with my new Revit model, I can create a package for those teams to consume.
To create a new package:
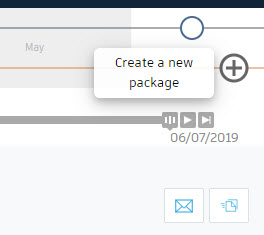
Select "Create new package"
Once you create a new package, you will be able to attach a new update to the model, any sets you wish to add, and any documentation that is important to the update.
- Add sets, models, and documents here
- Shows a preview of what you are sharing
- Share when you are finished
Once a package is created, users can consume that package and update their copy of the Architect's model.
In this example, since I am the Architect, I controlled when and how my Revit model is shared with the rest of the project team. When I create a package, the other teams can choose to consume that data and use it for their model and design.
Keep an eye out for the continuation of this blog series where we dive deeper into each one of theseBIM 360modules. We will describe how to set up a module, key features to understand and utilize for each module, how it connects to other modules, and provide insights and tips on how to best use these modules for your projects moving forward.
Read the other parts of this series:
BIM 360 Guide Series: Part 1 –BIM 360Platform
BIM 360 Guide Series: Part 2 – Document Management
BIM 360 Guide Series: Part 3 – Project Management
BIM 360 Guide Series: Part 4 – Insight