I am a huge fan of loadable components both 3D and 2D. So today, I'm going to take this post and talk about detail components (the 2D ones) inside Revit and why you should be using them.
First of all, I am 100% a keynote person, and not just keynotes in general, but element and material keynotes. If my object knows the keynote that is assigned to it, all the better for making my detailing task more efficient. You can assign a keynote value to an object either by specifying the note in the type properties or by tagging an "element" keynote and then assigning the value there. Revit element and material keynotes work like tags, where they are pulling/pushing information from the object that they are keynoting. If you are using keynotes, then you have to use components, because keynotes cannot be attached to detail lines, filled regions, or detail groups.
Making a Revit Detail with Components
Everything in this image that's red is a detail component, from the breaklines to the ACT ceiling section. This makes it very quick and easy to create similar details and maintain consistency across your drawing set. Those keynotes are attached to the elements they are noting and each object knows it's keynote value!
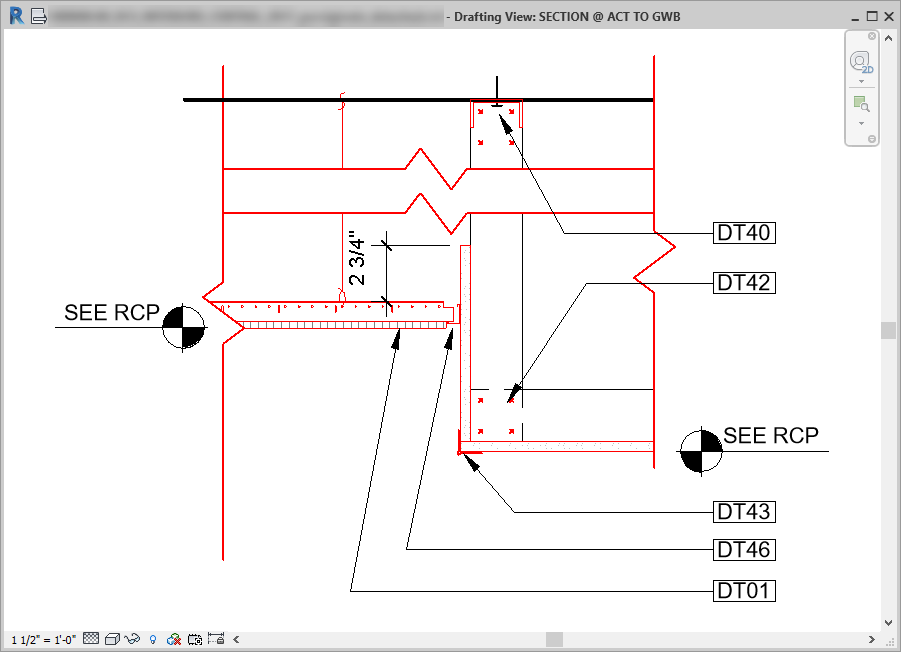
What does this really mean? You can take this Revit drafting view, duplicate it with detailing, and then just change the things that are different. You can draw a brand new detail, use element keynotes, and the individual detail components will tag like magic!
This also means that your office can have a robust library of detail components with pre-assigned keynote values associated with a robust master keynote list, making it easy to efficiently note across different projects.
A Few Things To Remember
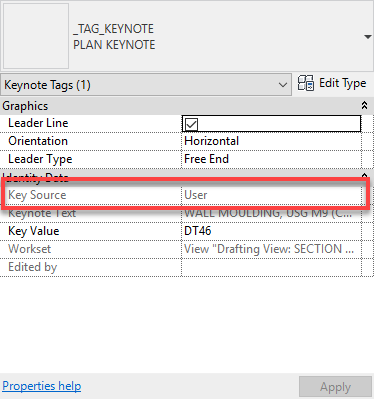
- Element and material keynotes inside Revit are AWESOME if you know how they work, but they can be terrible if you don't. When using these types of keynotes you MUST check what type of keynote you have before you change the value, because if you change an element or material keynote, it will change GLOBALLY in your project. To check what type of keynote tag you have (element, material, user) select it and check the properties under "Key Source."
- Just because the Revit element knows its keynote doesn't mean that it's correct. You still need to read the text of the note to make sure that it is the correct note. Remember that Revit is a tool to help you, it can't do your work for you.
- Make sure that everyone working on a project understands how the keynoting is being done on the project so that you don't accidentally change something globally.
A Few Limitations
- You can't attach keynotes to repeating details. This really stinks. Typically what I do is place one single detail component under the repeating one to attach my keynote to.
- You can't attach keynotes to the built-in insulation detail component in Revit, another stinker.
- Another solution for the two above is to use a material keynote and attach it to the layer in the wall/floor/element below. This will work nicely in a wall section.
Some Tricks of the Trade
- If you need to keynote something like a whole room in a plan, don't attach your keynote to a random object like the floor or wall. Instead, use a line-based detail component drawn on top of a wall to attach it to. This way, if the modeled geometry changes or gets deleted, your note will stay put, because it's attached to a view-specific item.
- You can also use a detail component to attach a keynote to on a photo. This is a great way to quickly show scope without unnecessary modeling. Same with CAD underlays.
[caption id="attachment_31272" align="alignnone" width="700"]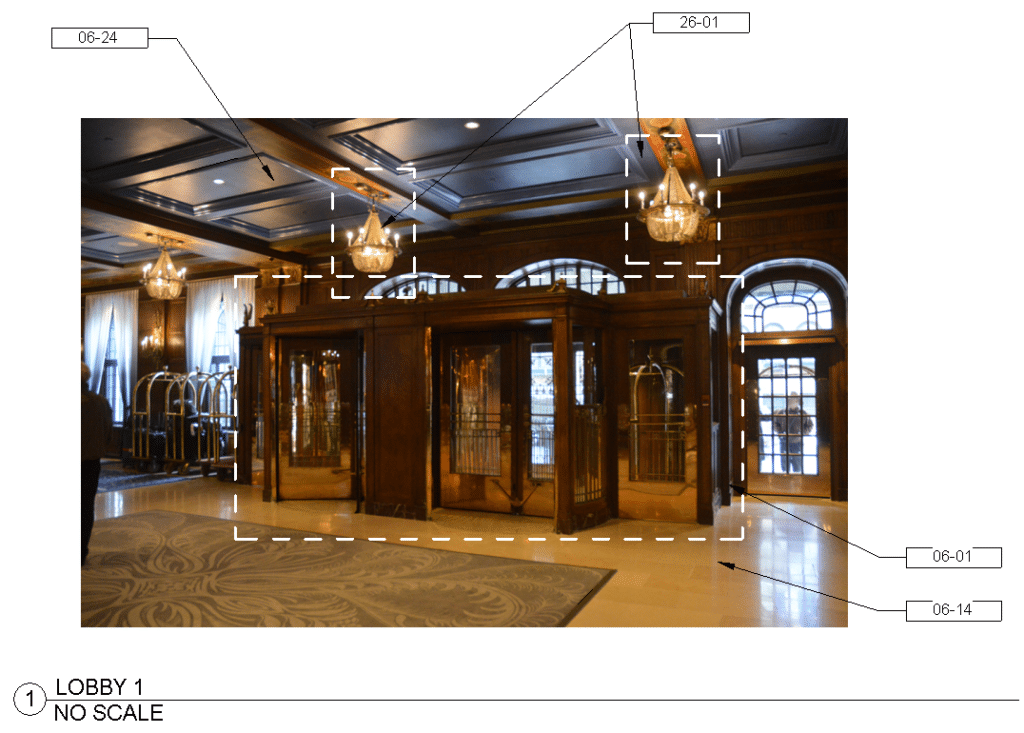 The white dashed boxes are detail components on top of the photo. The keynotes are attached to those.[/caption]
More Reasons to use Detail Components
- They keep your file size down. Revit processes components as a single element, not each individual line/region in the element. I created a blank file with a square made of detail lines, arrayed 40 x 40 and another doing the same thing, but with a square detail component instead of 4 detail lines making each square. The one made of detail components was 25% smaller. Think about this across a real project and you can see how it can really add up.
- Create a standard of graphics across the firm.
- Makes the tedious go faster!
Hopefully, now you'll consider using detail components inside Revit if you aren't already.
Happy Reviteering!