If you've worked in Revit long enough, you know that inserting AutoCAD DWG files into a Revit project can really muck up your model. Most people avoid it or even ban it in their office. That is a great practice when working in Revit projects, as you can link DWG files and not have to insert them, but the same functionality doesn't exist in the Family Editor. You can only import and not link DWG files into families. There are times when you need to bring DWG files into families, for example, to build Detail Components. So, what can you do? We at CADD have accumulated decades of experience using Revit in production, so here are our recommendations.
Workflow 1 - Drafting Views
If you're simply trying to reuse DWG geometry in your Revit project, follow these steps:
- Clean up the DWG file (see more on this below)
- In a new Revit project created from your template, link in the DWG file into a Drafting View
- Create the detail on top of the DWG file using Detail Components, Detail Lines, and Filled Regions as needed
- Remove (unlink) the DWG file and save your new Revit project as a temporary file
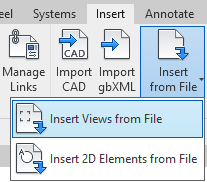
- Insert the Drafting View you just created in the temp file into your project
Workflow 2 - Detail Component Families
If you need to use a DWG file to help build a family (in this case, a Detail Component), then follow these steps:
- Make a new family using the appropriate family template (in this example, Detail Item)...this will be your 'quarantine' file
- Clean up the DWG File (see more on this below)
- Import the DWG file into the family (DO NOT explode it)
- Trace on top of it with Detail Lines and Filled Regions
- Delete the DWG file in the family
- Copy all of the linework to the Clipboard
- Paste the linework into another brand new family and save it
- Bring your new family into your project
- Delete your 'quarantine' family file
How Best to Clean a DWG File
What are some of the steps you can take to clean up a DWG file before bringing it into a Revit project (linking) or family (inserting)?
- Delete all Hatch entities, Layouts, Text, Dimensions, and other annotations
- Explode all the blocks and intelligent AEC objects down to primary AutoCAD entities such as lines, circles, and arcs (you may need to explode several times)
- Place everything on Layer 0
- Purge out everything multiple times (be aware that some purgeable items are only found via the command line version of Purge by typing "-PURGE")
- Setting the BASE point to 0,0,0 if it's not already
- Using WBLOCK to export all the geometry to a new DWG file is a great way to purge out items
- If you've ever received the "Line Too Short" error in Revit, simply scale everything in your DWG file up by 10x and then scale it down after inserting it into your Revit file
Most of these steps can be saved to a script file or built into a LISP routine to be able to run through them all in one-click. If you would like help with this, just let us know.