We are rolling down the highway in our comically small car as we highlight some of the best Revit commands that usually get ignored because their buttons are so small! If you missed parts 1-3 of this series, you can read the individual posts in the links below.
Check out Part 1 on the Linework command here.
Check out Part 2 on the Selection Box here.
Check out Part 3 on Match Type Properties here.
Displace Elements
Back on the Modify tab in the View panel (which seems to get a lot of small buttons), you can find the Displace Elements tool. It only activates in a 3D view and when you have a model element selected.

And here it is ready for its close-up:

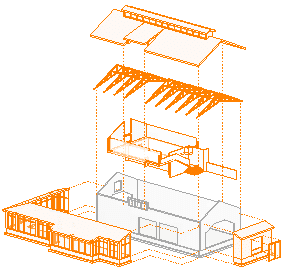
What the Displace Elements Command Does
When working in Revit, you are making a 3D model. It's easy to forget that as we spend our time working in plans and elevations or sections. But you have a vast amount of design decisions sitting in there that are often easier to see in 3D.
Sometimes it's easier to convey your design intent with an exploded view, so the owner or contractor or sub or whoever can see just how those puzzle pieces click together.
In a 3D view, select the elements you want to "move" then click on the Displace Elements command. You will then see a gizmo on the element - oh yeah, that's really its name - and you can drag the gizmo to move the element out of the way.
This is a view specific change. It does not impact your model at all. You can then also go back and use the Path tool to give a dotted line trail of the original location of the element.
There is also a convenient Rest button that will remove a displacement on an element, and a Highlight Displacement Set temp view override to help you remember what has been tweaked in a specific view.