How to Change or Reset Licenses the "Easy" Way
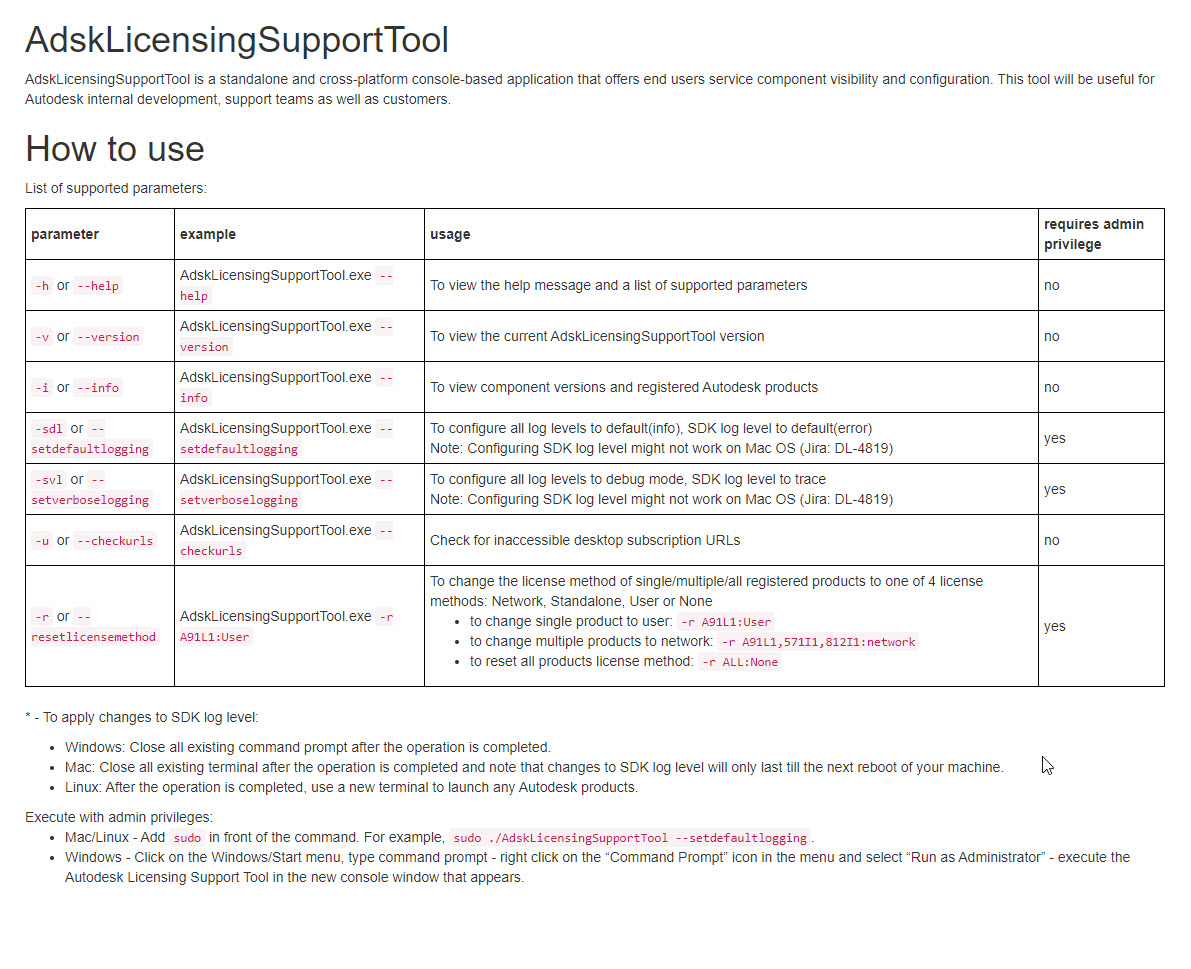
In the past, Autodesk had support for a few different methods to Reset your Licenses. However not only has the method changed a few times over the year, but it usually required going through and changing each product one at a time. With the upcoming transition to named user Licenses, you might be dreading the thought of changing each machine on your network over to a new licensing type one by one. Additionally, if you have many different products or version years of the software, this could potentially eat up hours of works!Fortunately, Autodesk has released a tool called the "Autodesk Licensing Support Tool" which enables you to set or reset all of the licenses on a machine in one go! This is great news for people with a lot of products and a lot of machines, however documentation on this tool is not the easiest to wade through, so we've written this handy guide to highlight the method we think will work best for MOST users.
Download and Setup
To get started you'll need to download the new tool from the following link:Autodesk Licensing Support Tool
Next unzip the folder to an easily accessible location, for the purposes of this guide we recommend:
C:\\Autodesk\\Scripts
Lastly, you'll need to open a terminal of your choosing in this location.
- Press the windows key to open up the start menu
- Type "Powershell" until you see "Windows Powershell" show up. Make sure you do not select the Windows Powershell ISE which is a different tool.
- Right click on "Windows Powershell and select "Run As Administrator"
- Then type the following (make sure to replace the path with your actual file location):
cd C:\\Autodesk\\Scripts
Getting It Done
Now for the fun part. Simply copy and paste one of the following code snippets into your command line window and hit enter:Code for Resetting all Licenses to Named User:
.\AdskLicensingSupportTool.exe -r ALL:USER
Code for Resetting all Licenses:
.\AdskLicensingSupportTool.exe -r ALL
[caption id="attachment_34494" align="alignnone" width="712"] You should see output similar to this.[/caption]
And that's it! That machine has been either reset or transitioned to Named User activation. Once the user logs into any product on the machine (if they haven't already) all products will open and activate off of their Autodesk Account User Assignments.
Quick Note: If you get an error during the script, and you are running Powershell as admin, you may need to change your execution Policy. You can do this by runningSet-ExecutionPolicy Bypassbefore you start the script and then runningSet-ExecutionPolicy Defaultafter you have finished up.
Further Documentation
If you are an advanced user and want more information on what can be done with this tool, I highly recommend checking out the resources below:Transition to Named User Guide
User Documentation for the Autodesk Licensing Support Tool
Conclusion
Using the basics laid out above, you should be able to transition lots of machines very quickly and easily. But of course, if you run into trouble, that's why we are here too! You can always reach the CADD Microsystems Helpdesk at:703-924-7310
-Your Friendly Neighborhood CADD Care Team