Every single element in your Revit model, and I am talking about instances and types here, has an ID. It's a way for the Revit database to be able to keep elements organized, find what it needs to find, and act like a good database should act. And also to see if that element is old enough to buy beer.
Sorry. I'm really sorry for that one. I know better.
You aren't going to need to track down or use an element ID in normal day to day Revit modeling. But every once in a while, it's good to know how to get an element's ID and what you can do with it.
How to determine a Revit element ID
The element ID is unique to its element so it's a nice way to be 100% sure you are grabbing the right element. The in Revit way to get an element ID is to:- Select an element, or several elements
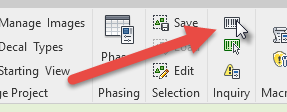
- Go to Manage tab > Inquiry panel > IDs of selection tool
Another way in Revit you can see the element ID is through a model's warnings list. Any element associated with a warning will have its ID listed as well. But this is only going to show you elements that are having problems. And, of course, I'm confident your model has zero warnings in it. Right?
Oddly, there is no way to add element ID to schedules, or see them in the element properties. There are numerous "third party" methods of getting element IDs, whether through an add-in, macro, or Dynamo. It seems odd that the roundabout methods are the only way that Revit directly supports.
What to do with element IDs in Revit
Inside Revit, there's pretty much one place to go when you have an element ID. That's back to the Manage tab > Inquiry panel and running the Select by IDs tool.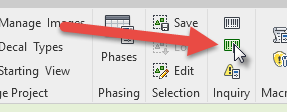
This window will let you put in one or more element IDs, then Revit will select or show the matching element(s).
If you have an exported warnings list, you can find the element IDs in the list and select them this way to identify the trouble spots.
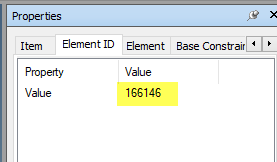
Likewise, if you are using Navisworks and have appended a Revit model, you can backtrack to the original Revit element through the element ID. The Revit element ID will be in the Navisworks object's properties window on the Element ID tab.
What to watch out for
There is one thing to note about element IDs - while they are unique, they are not set in stone. Copying models, saving as, worksharing and syncing, all of these every day activities can force an element's ID to change so you can't just get a list of all the element IDs and expect it to be the same list. You need to update and verify as needed.Don't forget that at its heart, Revit is a database and tracking elements by ID is a very database-y thing to do. Full disclosure: there's another ID attached to elements as well, but that's getting way in the weeds and the number it uses is obnoxiously long. Hopefully, you won't need to find elements by ID to fix them or resolve warnings, but if you need to, it's a pretty straightforward process.