The update to the Autodesk Model Checker for Revit has been out for a while now. With it came a slew of updates including much better control about what checks were turned "on and off" when you configured your model.
From the user's perspective, the change looked simple. Peeking under the hood reveals that how the Model Checker information is saved in a Revit model got a total overhaul. Basically, each individual section and check's on/off are now stored in the Revit file... don't worry, this has almost zero impact on file size. Before, the Revit model only remembered the checkset XML to look at, and that XML was in charge of what check was on and what check was off.
Let me see your ID
To accomplish this, the Model Checker update introduced IDs for every filter, every check, every section, and every heading in a checkset file.

In your Revit model, the Model Checker stores some information and says "The XML is found here, and when you open it up, ID 00066391-315f-41d4-accc-b7349e26ed90 is turned on."
This is a great new addition and helps you rely on a library of checksets, instead of needing to manage one per project or even phase.
Make sure that ID is unique
What is absolutely critical is that every ID in your checkset file is unique. Normally, if you make your checks with the Model Checker Configurator, you don't need to worry about this at all. The software takes care of it.
As a time saver, a lot of users will edit their checkset XML directly in a text editor (I like Notepad++). Since the XML is just text, sometimes copying and pasting a whole section is easier than making it from scratch. For example, say I have made a check for Doors and I am verifying a dozen parameters. Now let's say I want to do the same thing, except for Windows. In the Configurator, I would have to build each line over. But since the two checks are virtually identical, I just need to find the completed one in a text editor, and then copy and paste it. Then all I need to do is change OST_Doors to OST_Windows... and I can do that in my text editor or back in the Configurator.
The issue now, as you can probably see, is that if I copy/paste the text, I am copying those IDs also. And as we noted above, they need to all be unique.
How to fix copied IDs
The good news is, this isn't hard to deal with. The simple steps are:
- Delete the ID="blah-blah-blah-blah" text from each filter, check, section, and heading that you copied
- Save your XML file
- Open that XML file back up in the Model Checker Configurator - the Configurator will automatically generate new IDs for any item that does't have one.
A manual select and delete will work great for small checks. Just clear them out and then open your XML up in Configurator and save. You're all set.
However, if you have made a REALLY big check with dozens and dozens of filters, manually deleting might take some time. Luckily, a more advanced text editor can probably help you out with this.
Note: As I mentioned, I like Notepad++, so these steps are for that software. I bet other text editors can do the same (feel free to shoot me a note on Twitter and let me know!)
What we need to do is look for a pattern of text that matches the ID="blah-blah-blah-blah" string, then get rid of it. We can do this with a regular expression and the Notepad++ replace feature. You can think of regular expressions as really advanced wildcards.
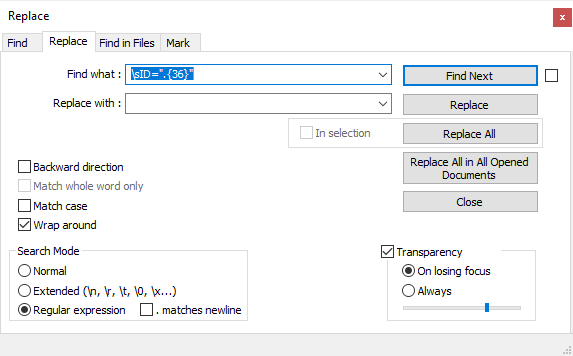
To clear out your IDs in your XML in Notepad++
- Go to Search > Replace
- In Find What, put in
\sID=".{36}" - In Replace With, make sure it's blank
- At the bottom under Search Mode, toggle Regular Expression
- Click Replace All. All your IDs should disappear
After you run the replace, your text will look like this:
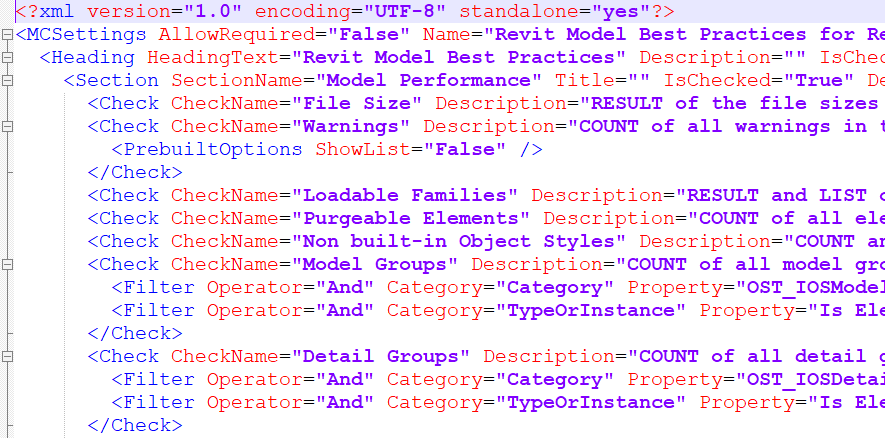
Then, just open it back up in Configurator to create new IDs and you're all set.
The Model Checker is a great way to make sure your Revit models are up to snuff with your office and deliverable standards. We love making checks and more importantly, we love helping to make sure your Revit files are in the state you want them to be. If you haven't looked at the Model Checker and what it can do, take look and try it out.