In the last 6 months, we've received the question "How do I download the Site Designer add-in for Revit 2021?" several times. Those that skipped that release and went straight to Revit 2022 are also asking the same question. After a brief discovery, almost all of our clients that are interested in getting that tool wanted to use it for the import Landxml tool. This is also when we have to regrettably tell them that as of Revit 2021, Autodesk decided to discontinue the Site Designer add-in for Revit.
Site Design History
For those that don't know, Site Designer was an add-in for Revit that had some useful tools for working with topography and other site-related elements. One of the most commonly utilized tools was the import Landxml which allowed for the creation of Revit topography from a LandXml document. What was really useful about this tool was that it used Revit's Shared Coordinate system rather than the Project Coordinate system for locating the topography. This allowed for the topography to come into the correct location based on the real-world coordinate location.[caption id="attachment_35420" align="aligncenter" width="1024"] Site Designer Ribbon[/caption]
Moving On
Now that we've had a nice trip down memory lane, the question is, "how do I coordinate Topography now that I do not have this tool?"Option 1 - Link Topography
[caption id="attachment_35421" align="aligncenter" width="350"]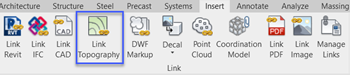 Link Topography Tool[/caption]
Released with Revit 2019, Link Topography was added to the Import ribbon. This allows for the linking of a specially created DWG file that is hosted on BIM 360. This DWG file contains all the information to create a Topography surface. Look at the Allies at Last: Getting Architects and Engineers on the Same Coordinate Page AU presentation for a step-by-step handout on the process and a video presentation using this workflow.
This is by far the easiest approach to maintain coordination over the life of your project, as Civil can update the DWG and Revit users can reload the file like any other link. As mentioned, this requires the use of BIM 360 , which can make it not a good option for some users and some projects.
Option 2 - Import CSV
[caption id="attachment_35422" align="aligncenter" width="506"]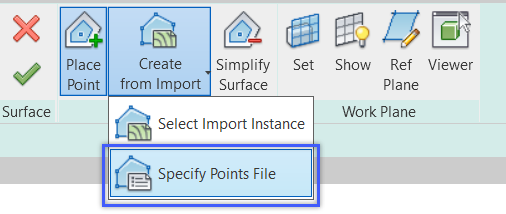 Import Points File[/caption]
So, what do you do if your project is not on BIM 360. Well, you have to resort to the old import CSV methodology. This method is outlined in the Create a Toposurface with a Points File AKN article. There are a few things you need to keep in mind to utilize this tool.
- Make sure the CSV file is formatted correctly. If it is not, then the points will either not generate or will be in the incorrect location.
- The points will be created using the Internal Origin as the origin point for the x and y location, not the origin of the Shared Coordinate. So you will have to either relocate the topography after it is generated or modify the points prior to creating the CSV to coordinate with Revit's Internal Origin.
- This ties to the previous bullet. Rather than using the Shared Coordinates origin for the zero value of the Z-axis, topography in Revit is associated to a level. That level will be used as the zero value for the points, and the points will be placed at their Z values above that level. This means that you need to create a Sea Level Revit Level to host the topography.
- The Big downside to this, is that anytime there is an update, you have to re-import the points and re-adjust the toposurface as needed.
Outside the box thinking
We here at CADD love to solve problems with outside-the-box thinking. And with that, we have two other options to consider.Option 3 - Use Revit 2020 and Upgrade
This option is not always going to be available, but it might just be the solution you need to solve the problem on a time crunch. In Revit 2020, install the Site Designer add-in. Locate a new file Shared Coordinates to the Civil file, just like your project file. Then use Import LandXML from the Site Designer add-in. After you import the topography, upgrade the Revit file to the version that your project is in, and either copy or link in the topography, depending on your needs.As previously stated, this will mean the topography is located based on the Shared Coordinates. However, this option will only be available as long as you can run Revit 2020, and it does require a lot of steps every time you need to update the topography. This may not be a realistic solution for some people.
Option 3 - Dynamo
Okay, I'll be honest, this is not an option for everyone. But if you know Dynamo or someone that does, Dynamo 2.x does contain out-of-the-box nodes for creating topography and reading files. So it is possible to write a script to replace the Site Designer Import Landxml function.We hope that these options will help you with your projects. You can always reach out to our team at CADD Microsystems if you have additional questions.