Bridget JohnsonMarch 22nd, 2019
Eliminate printing and scanning by signing documents in Bluebeam Revu
One of the many added benefits of using Revu is the ability to sign and certify documents digitally. Creating a digital signature enables almost instant turnaround and adds control over the content you are approving. Whether you need a quick turnaround to meet a deadline or you are simply streamlining your workflow, digitally signing documents within Revu will take you only a matter of seconds.
Your current workflow for digitally receiving and signing a document may look something like this:
- Printing the document or signature page
- Signing and dating
- Scanning the document back onto your computer
- Combining the signed page with the rest of the document
- Emailing the complete signed document
You can eliminate this entire workflow by creating a digital signature within Revu. Once set up, this workflow is streamlined down to simply opening the document in Revu, applying the digital signature, then re-saving and sending the document.
You can choose to certify your signature if you are the first signer, or if you are not going to be signing the document, you can certify the document and send it out to be signed by one or multiple signers. If your document will require additional signatures, be sure to add all signature fields before certifying.
Once a document has been digitally signed or certified, it's automatically locked from editing and the security status cannot be changed unless the signature or certificate is cleared. You can easily clear your own signature by right-clicking and selecting Clear Signature.
Read more about Certifying a Document here: https://support.bluebeam.com/online-help/revu2018/Content/RevuHelp/Menus/Tools/Signature/Certifying-a-Document.htm
Digitally Signing:
Digitally Signing and certifying a PDF That Already Has a Signature Field
- Click in the desired signature field. The Sign dialog box appears.
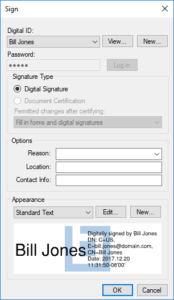
- Choose a Digital ID.
- For PKCS #12 IDs, enter the Password and click Log in. Windows Certificate Store IDs do not require a separate password as they are protected by the user's Windows login.
- Select Document Certification and choose one of the Permitted changes after certifying options:
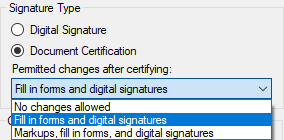 - No changes allowed: No changes are permitted and no other signatures can be added.
- Fill in forms and digital signatures: Form fields can be completed and signatures added, but no other changes are permitted.
- Markups, fill in forms, and digital signatures: Markups can be added, form fields can be completed and signatures added, but no other changes are permitted.
- No changes allowed: No changes are permitted and no other signatures can be added.
- Fill in forms and digital signatures: Form fields can be completed and signatures added, but no other changes are permitted.
- Markups, fill in forms, and digital signatures: Markups can be added, form fields can be completed and signatures added, but no other changes are permitted. - Complete any of the desired Options fields.
- Select an Appearance for your signature.
- Click OK. A Save As dialog box appears. Signed documents must be saved at the time of signature placement.
- Enter a file name and select the location for the signed file, then click Save to save the signed PDF.
Digitally Signing a PDF That Does Not Have a Signature Field
- Go to Tools > Signature >
 Sign Document.
 - Click and drag a rectangle to define the region where the signature will appear. The Sign dialog box appears.

- Choose the Digital ID to sign with.
- For PKCS #12 IDs, enter the Password and click Log in. Windows Certificate Store IDs do not require a separate password as they are protected by the user's Windows login.
- Under Signature Type, select Digital Signature.
- Complete any of the desired Options fields.
- Select an Appearance for the signature.
- Click OK. A Save As dialog box appears. Signed documents must be saved at the time of signature placement.
- Enter a file name and select the location for the signed file, then click Save to save the signed PDF.