It's the holiday season, which means the return of our Twelve Days of CADD Care blog series! Our team is joining together again this year to provide a round of helpful tips, tricks, and tidbits to make your life easier. So without further ado, let’s kick off the fourth annual series:
On the first day of CADD Care, the CADD Team gave to me… A Civil 3D Tip!
Many AutoCAD users have benefited from the use of Tool Palettes. They are great for providing easy access to blocks, switching between profiles, running LISP routines, and more. Tool Palettes can be customized for the needs of each company or individual. If the intention is for customized Tool Palettes to be accessible to multiple users, the normal process is to store them on a network drive and then use the AutoCAD Profiles to point to the network path in addition to the out-of-the-box path that is pointing to the default palettes on the hard drive. But did you know that even if you add a second path in the Profile, you set it to the customer location, and you move it to the top of the list, the program will still save any new Tool Palette that is created to the hard drive location? For example, take a look at the screenshot below:
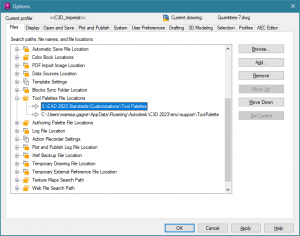
We've added a new path and I've pointed that new path to a specific location on a network drive (S:). See how the standard, out-of-the-box path is still there, but the custom path is at the top? Believe it or not, the order here doesn't matter. If the out-of-the-box local path is present, that is where the program will store any new Tool Palettes that we create.
So what should we do if we want to store these new Palettes on our network drive so everyone can get to them? Can we just create them on the hard drive and then copy/paste them to the network? Well, you could try, but Tool Palettes are very picky about the location of their files and the paths that are stored in them. For best results, we really should create these right in our network folder. But how do we do that? Do we just remove the standard, out-of-the-box path? The answer here is "yes, but no".
Let me explain a little further. Can you remove that path to the C:\ drive? Yes. Is this the best thing to do? The answer to that is "no", especially in Civil 3D. In Civil 3D, that path is pointing not only to standard AutoCAD Tool Palettes but also to Civil 3D's Subassembly palettes. What many don't realize is that stored within AutoCAD Profiles along with the Palettes are the Palette groupings.
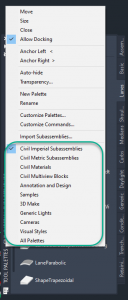
What is that important? When you right-click on the title bar of the Tool Palettes window, you have the ability to switch between different groups of Palettes, including those created to hold Civil Imperial Subassemblies, Civil Metric Subassemblies, Civil Materials, and Civil Multiview Blocks (see screenshot below). Since there are a large number of Civil 3D Palettes, these groups can be extremely helpful when you are trying to access the ones you need.
Here's the issue: If you go into your AutoCAD Profile and remove that path to the hard drive that is pointing to these Palettes, you will not only lose access to those Palettes but you will also lose the definition of all of those helpful groupings. It only takes one time to find out the hard way that even if you add that hard drive path back in, these handy groupings are gone. And believe me, rebuilding all of them is no easy task.
So what should you do? Here's my quick guide to the best way to create custom Tool Palettes on a shared location while still maintaining access to and groupings for the out-of-the-box Civil 3D palettes.
- Open up the Options dialog. Create a new, temporary Profile that is a copy of the out-of-the-box Profile (or a custom one that you already started creating), then name it something obvious like "Tool Palette Creation Only". Make sure to NOT write over the out-of-the-box Profile!
- Set this new Profile to the current Profile
- On the "Support File Search Paths" tab of the dialog, replace the out-of-the-box Tool Palette path that is currently pointing to the hard drive with the desired location on the network. At this point, you should only have one path for the Tool Palettes and it is the shared location.
- Hit "OK" to close the dialog
- Create your customized Tool Palettes as needed. They will be created and saved in the chosen shared location. Do not create a Tool Palette group at this point. It will only be saved in this temporary Profile, which is not what you want.
- Go back into the Options dialog and set the original Profile (the one that you copied) to be current.
- On the "Support File Search Paths" tab of the dialog, add a new path for the Tool Palettes and set this new path to the shared location where your Tool Palettes were created. Make sure not to overwrite the "Tool Palettes Only" Profile you were just working in. You might need that later.
- Hit "OK" to close the dialog and apply the changes. This will allow you to see both sets of the Tool Palettes (yours and the out-of-the-box Civil 3D Palettes) and the original groupings will still be in place.
- If desired, go back into the Tool Palettes and create a group that contains your custom Palettes. This will be written to the current Profile along with the out-of-the-box groups that are there for the standard Palettes.
Happy Tool Palette-ing!
Check back tomorrow and next week to see what other tips and tricks the CADD team has in store for the remaining Twelve Days of CADD Care.